
I thought I’d take some time to capture how to ship log files from disk to s3 using fluentd. Fluentd is an open-source data collection and transport tool. There is a stable distro of fluentd called td-agent which is maintained by TreasureData. This blog post will be leveraging td-agent. Users can use (and create) plugins to equip Fluentd o handle their special use cases.
Things you’ll need
- Debian/Ubuntu host (the steps in general may apply to non-Linux platforms too)
- Install td-agent
- Logs you want to ship
- An AWS account (you may use a trial accoun)
- An S3 bucket
Create a Free AWS account
For proof-of-concept purposes, a free-tier AWS account will suffice. Luckily AWS supports e-mail addresses with the ‘+’ character, so no need to create a bunch of throw-away e-mail accounts for testing ;).
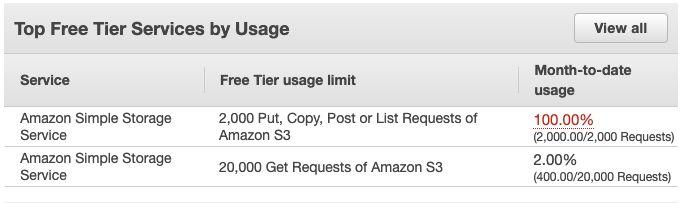
As of authoring this, the free tier account includes 5GB of S3 storage, and 2,000 PUT|COPY|POST|LIST requests.
Create an S3 Bucket
To create the policy, in the AWS Console:
- Go to the S3 service
- Click Create Bucket
- Complete the form…
- I am naming the bucket 20220117-logs for this example
- Do not make it the bucket publicly accessible
After creating a bucket:
- Go to your bucket,
- Click Create Folder (prefix)
- Choose a folder name that is describes the logs that fluentd will be shipping
- I am making a folder named go-audit for this example
- (Repeat for each log type)
Configuring the AWS Policy
fluentd will require the following permissions at a minimum to write to S3:
- PutObject
For the use case of log shipping, I am going to assume you only wish to use a bucket you’ve already created that is ACL’d and otherwise configured appropriately.
We only want Fluentd to be able to write to the bucket or list buckets, but not read any logs from the bucket. “Why is that,” you ask. In the event that the API credentials for the user to which you are going to assign this policy are stolen, the policy’s permissions will not allow user to fetch any logs from the bucket, only write.
To create the policy, in the AWS Console:
- Go to the IAM service
- Go to Policies
- Click Create Policy
- Select the JSON option
- Copy the JSON blob below
- Paste the JSON in the JSON editor (update the bucket and object ARNs)
The JSON below grants s3.PutObject permissions for:- Objects in the
20220117-logsbucket matching the directory structurego-audit/*
noticego-auditrefers to the folder we created in the bucket; the/*following the folder is what allows us to create objects in the folder.
- Objects in the
{
    "Version": "2012-10-17",
    "Statement": [
        {
            "Sid": "FluentdWritePolicy",
            "Effect": "Allow",
            "Action": [
                "s3:PutObject"
            ],
            "Resource": [
                "arn:aws:s3:::20220117-logs/go-audit/*"
            ]
        }
    ]
}
Configuring the AWS User
Unsurprisingly, fluentd requires AWS API credentials to upload ship stuff to S3. The best practice is to create an minimally scoped user account dedicated for this purpose.
So, let’s create a user and assign the policy we created to that user.
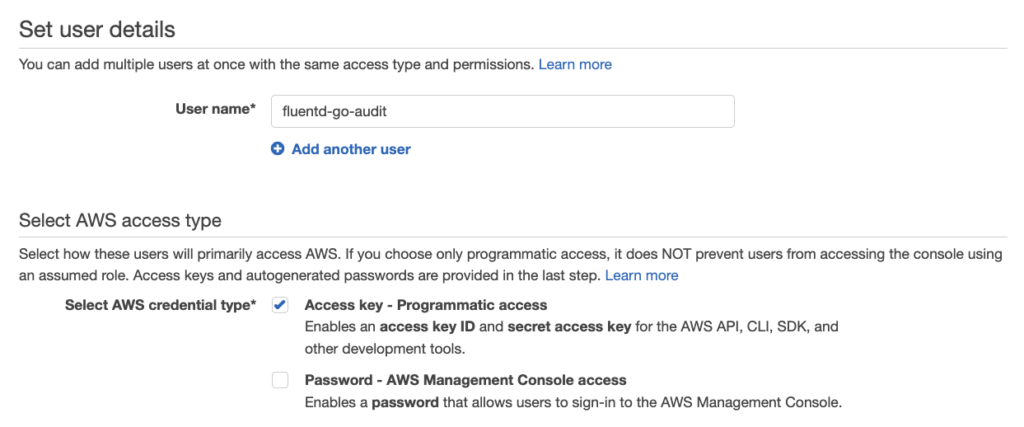
So log into the AWS console, go to IAM (Identify and Access Management >> Users >> Add User
- For this example, we’ll name the user fluentd-go-audit
- For AWS Access Type, select Access key (leave Password unchecked)
- Click Next to configure the user’s permissions
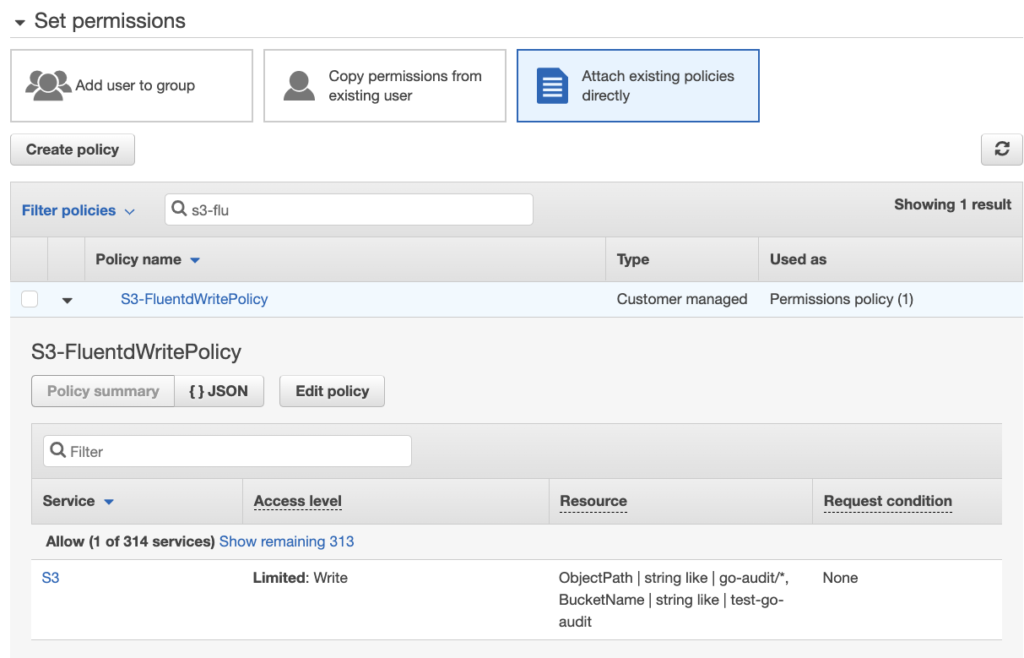
- We will attach the policy we created earlier. Click Attach existing policies directly
- Search for the policy you created and check the box next to the appropriate policy
- Click Next to create any tags for the user
- Click Next to review the configuration
- Click Create User
- When you have created the user, AWS will provide you the API credentials.
Store the API key and secret in your password manager, as the secret will not be viewable after leaving this page.
(Optional) Configuring go-audit
For this example, I’ll be using logs generated by my fork of go-audit. I’ve tweaked the configuration so that the go-audit log file is written to /var/log/go-audit/go-audit.log and so that it makes the owner of the file the td-agent user.
You can read more about my fork of go-audit here.
The configuration should be modified like so:
...

  stdout:
    enabled: false     ### <--- Set this to false

...

 # Appends logs to a file
  file:
    enabled: true      ### <--- Set this to true
    attempts: 2

    path: /var/log/go-audit/go-audit.log ### <--- ensure the directory /var/log/go-audit exists

    mode: 0600       ### <-- either make the permissions world readable OR set user to td-agent
    user: td-agent   ### <-- either make the permissions world readable OR set user to td-agent
    group: root
...
Run go-audit using the following command:
sudo ./go-audit --config go-audit.yaml
Installing and Configuring fluentd (td-agent)
So now that we have bucket and account in AWS configured and we’re running go-audit, we can start using td-agent to ship logs. Once you have installed td-agent on your host, you’ll need to update the td-agent configuration to parse your log files and ship and send matching log files to s3. The example configuration below ships go-audit logs to S3.
The example td-agent configuration below ships go-audit logs to an s3 bucket every 5 minutes (/etc/td-agent/td-agent.conf)
Once td-agent is configured, restart the td-agent service with the following command:
sudo service td-agent restart
It might also help to tail the td-agent logs to identify any issues: tail -f /var/log/td-agent/td-agent.log
# Uncomment the stanza below if you would like verbose output in the td-agent logs
#<system>
#log_level trace
#</system>


# td-agent will do the equivalent of "tail -f <log_file>", pos_file allows td-agent to pick up where it left off
<source>
  @type tail
  @id input_tail
  <parse>
    @type json
  </parse>
  path /var/log/go-audit/go-audit.log          # The td-agent user needs to be read the log file
  pos_file /var/log/go-audit/go-audit.log.pos  # This allows td-agent to pick up where it left off in case the the service is interrupted
  tag s3.*
</source>


# s3 output for go-audit logs (match by tag)
<match s3.var.log.go-audit.go-audit.log>
  @type s3

  aws_key_id AWS_KEY_ID
  aws_sec_key AWS_SEKRET
  s3_bucket 20220117-logs   # Bucket name
  path go-audit             # path (relative to root of bucket) where logs should be stored in S3, no trailing /

  # turn off some default settings to eliminate unnecessary API calls and allow us to use minimal permissions
  check_bucket false           # check if bucket exists
  check_object false           # check if object exists
  check_apikey_on_start false  # check if api key works by getting a listing of objects

  # The path structure of the files as they will appear in S3
  s3_object_key_format %{path}/%Y/%m/%d/%H/%Y-%m-%d.%H/%{time_slice}_%{hms_slice}.%{file_extension}


  <buffer>
    @type file
    path /var/log/td-agent/s3
    timekey 60
    timekey_wait 60s
    chunk_limit_size 256m
    flush_mode interval
    flush_interval 60s
  </buffer>

  # The logs are already in json, just need to transport to s3 as-is
  <format>
    @type json
  </format>
  store_as text

  time_slice_format %Y-%m-%d.%H.%M.%S
  utc
</match>
Shanief is a seasoned cyber security professional, with over 8 years of diverse experience in enterprise intrusion detection, response and threat hunting.